Covering a Lampshade – Crafty Sunday Tutorial
I have always wanted to attempt covering a lampshade after seeing various workshops for this pop up. To think I could co-ordinate anything I wanted is very exciting at a fraction of the price you would pay in a store.
So here is how I did mine, I did some reading online as to how to go about it, but after making this one there are some tips I could have done with so I will add them along in the tutorial.
What you will need:
* Plain lampshade (I bought mind online from Tesco it was £3.99)
* Enough fabric to cover the lampshade
* Paper and pencil to draw your template
* Glue gun
* Adhesive glue spray (I took a chance with 3M Adhesive spray glue and it worked a treat, I got mine from Ryman – a little pricey but you will use it for lots of crafty projects)
* Any embellishments to add to the lampshade
Step 1
I only had A4 printing paper to hand so I sellotaped the pages together to give me a large enough piece of paper to draw my stencil. What you need to do is to put your lampshade at the edge of one side (left or right it does not matter) and roll the lampshade across the page. Whilst you are doing this use your pencil to follow the line of the lampshade (do the bottom edge first then the top edge) by drawing the line just underneath the lampshade, its not very dark in the photo below but you can see what I mean. Draw a line from the bottom to the top edge to complete your shape.

Top Tip – I found that starting at the edge of the lampshade with the fold line (all of them will have some sort of joining line of the material used to make the lampshade) made it easier for me to know when to stop rolling and my bottom / top line was complete.
Step 2
I then used the template to cut my fabric. Cotton fabric is always going to work best as it is stiffer, after some practice I am sure lighter fabrics will be ok too but I would stick with cotton at the start. I used Amy Butler “LOVE” fabric. It wasn’t too expensive, at £2.90 per 1/4 metre. Purchased from Cottonpatch.
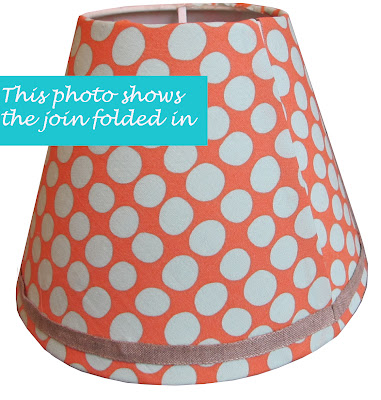
Top Tip – Seam Allowances use about a 1cm seam allowance for the top and bottom. I didn’t give myself enough allowance to account for the rolling over of the lampshade edges and was in a bit of trouble because of this …. so I think 1cm top and bottom will be ample – you can always trim it later! For the sides – I gave myself a 1cm seam allowance on one of the sides only so I could fold it the edge in to create a neat joining and this worked well.
Step 3
Then use your adhesive spray to spray the glue onto the fabric. Carefully stick the fabric to the lampshade. Fun fun fun! This spray was great because I was able to stick and unstick several times until I was happy with it and had got rid of the air bubbles, after all of this the tack still remained.
Remember to fold in one side so that is give its a neat and professional finish where the two sides join.
I then used the glue gun. A glue gun is the best buy by the way if you haven’t got a glue gun in your craft box purchase one its life changing, well alomost :-). I pressed some glue onto the rims of the lampshade and then folded the fabric over so it just covered the rim edge. Do this stage by stage, don’t cover the entire rim with the liquid glue and then go round rolling the edge over, take your time the glue needs to be hot and you need to take your time especially for the top rim as this is very visible.
Step 4
And there you go the lampshade is complete. A really simple and effective project, the total cost was around £6.50 and it took less than an hour to complete. Perfect weekend project. I added some fabric ribbon to the lampshade at the very end.
If you cover a lampshade following these instructions send me your photos so I can add onto the Tea & Crafting Flickr group. Email: havingfun@teaandcrafting.co.uk If you are on Pinterst pin this tutorial with the badge below.
But most of all have fun!
The post Covering a Lampshade – Crafty Sunday Tutorial appeared first on Tea and Crafting.


Leave a comment